
Recap
In Part 1, we showed you how we set up the hardware for our new HPC server. In Part 2, we will now continue with the software.
Installing the CUDA Toolkit and NVIDIA Drivers
While NVIDIA drivers are provided in the non-free (restricted) Ubuntu repository, they turn out to be outdated. We therefore take the current drivers from NVIDIA:
- NVIDIA provides a package repository for Ubuntu. Installation is thus possible without any special effort.
- For CUDA, NVIDIA ensures a high degree of backward compatibility. The CUDA version 12.8, which was the most up-to-date at the time, supports the much older GPU architecture “Pascal” of the Tesla P40 GPUs.
- An up-to-date version of CUDA and all required drivers is a prerequisite for working with the latest AI tools.
The NVIDIA Installation Guide for the CUDA toolkit lists various possibilities and paths:
- Package Manager vs. Runfile Installation: Installation via the Package Manager is more convenient and has better system integration.
- Local Repo Installation vs. Network Repo Installation: As long as the machine has internet access, the network repo option is better. This gives us the latest updates from NVIDIA via apt upgrade.
- We choose the proprietary packages and not the open source packages, because in many respects the open source implementation is still lagging behind.
Our first step should be to check whether any packages are already installed which could lead to conflicts:
$ dpkg -l | grep nvidia
$ dpkg -l | grep cuda
This output should be empty. If it is not, any existing packages must be uninstalled.
According to section 3.8.3 from the installation guide, the GPG key and the repository can both be set up by installing a deb package. (For $UBUNTU_VERSION, the respective version is followed by the pattern "ubuntu2404".)
$ wget https://developer.download.nvidia.com/compute/cuda/repos/$UBUNTU_VERSION/x86_64/cuda-keyring_1.1-1_all.deb

# dpkg -i cuda-keyring_1.1-1_all.deb
The repository is then automatically created under /etc/apt/sources.list.d/cuda-ubuntu2404-x86_64.list.
After an apt update, the only requirement to install the CUDA toolkit is first installing a meta-package:
# apt install cuda-toolkit
The second step is to install the kernel modules. NVIDIA provides another guide for this. The repository is already set up, the meta package can be installed directly:
# apt install cuda-drivers
This also installs a whole range of packages that are only needed for desktops with displays. At the moment a compute-only variant is offered for Fedora, Suse and Debian, but not yet for Ubuntu. That’s it. After a reboot, all drivers should be set up.
The CUDA binaries are located in /usr/local/cuda-12.8/bin and should be included in the PATH as described in Section 10.1.1 Environment Setup.
An extension of LD_LIBRARY_PATH should not be necessary, as the configuration has already been done by the corresponding Ubuntu package (/etc/ld.so.conf.d/988_cuda-12.conf).
Verification
Below you will find a few useful commands which can be used to verify the installation. To verify that the desired driver version has been loaded:
$ cat /proc/driver/nvidia/version

NVRM version: NVIDIA UNIX x86_64 Kernel Module  570.133.20  Sun Apr 13 04:50:56 UTC 2025
GCC version:  gcc version 13.3.0 (Ubuntu 13.3.0-6ubuntu2~24.04)
To verify that the CUDA-Complier has been installed:
$ nvcc –version
nvcc: NVIDIA (R) Cuda compiler driver Copyright (c) 2005-2025 NVIDIA Corporation Built on Fri_Feb_21_20:23:50_PST_2025 Cuda compilation tools, release 12.8, V12.8.93 Build cuda_12.8.r12.8/compiler.35583870_0
To access the NVIDIA System Management Interface (SMI):
$ nvidia-smi`
+-----------------------------------------------------------------------------------------+
| NVIDIA-SMI 570.124.06             Driver Version: 570.124.06     CUDA Version: 12.8     |
|-----------------------------------------+------------------------+----------------------+
| GPU  Name                 Persistence-M | Bus-Id          Disp.A | Volatile Uncorr. ECC |
| Fan  Temp   Perf          Pwr:Usage/Cap |           Memory-Usage | GPU-Util  Compute M. |
|                                         |                        |               MIG M. |
|=========================================+========================+======================|
|   0  Tesla P40                      Off |   00000000:04:00.0 Off |                  Off |
| N/A   23C    P8              9W /  250W |       5MiB /  24576MiB |      0%      Default |
|                                         |                        |                  N/A |
+-----------------------------------------+------------------------+----------------------+
|   1  Tesla P40                      Off |   00000000:05:00.0 Off |                  Off |
| N/A   24C    P8              9W /  250W |       5MiB /  24576MiB |      0%      Default |
|                                         |                        |                  N/A |
+-----------------------------------------+------------------------+----------------------+
Getting Started
For a stress test of the graphics cards, we use gpu-burn. As the name implies, this pushes the power consumption of the GPUs almost to the limit of 250 watts per unit.
In the iDRAC you can see the impressive thermal effects this has: The temperature in the chassis (which has a volume of approx. 16 liters) rapidly rises to 60 °C. You don’t need maintenance software to notice this: The fans become noticeably louder, and it begins to smell iffy.
Inference with llama.cpp
There is a number of software options which run current open source language models. Examples include KoboldCpp and ollama, both of which have one thing in common: they rely on the library llama.cpp, which does all the “hard work” in the background.
For initial tests, it is a good idea to work directly with llama.cpp – for several reasons:
- Maximum control during configuration and optimization
- Detailed output of parameters and hardware properties
- New models often require up-to-date features – which usually are added to llama.cpp first
It is recommended to compile llama.cpp directly from the sources:
$ cmake -B build -DGGML_CUDA=ON -DCMAKE_BUILD_TYPE=Release -DCMAKE_INSTALL_PREFIX=/opt/llama-cpp -DLLAMA_BUILD_EXAMPLES=ON -DLLAMA_BUILD_SERVER=ON
$ cmake --build build --config Release -j 16
Optionally, install the binaries according to /opt/llama-cpp:
$ sudo cmake --install build
Compiling from sources
When compiling from sources, it is not uncommon to be confronted by cryptic errors. However, this is not a reason for concern.
- The basic prerequisite is development tools such as cmake and g++, which must be installed on the system. The build-essential meta-package, which bundles the most important tools, is recommended.
- More often than not so-called dev packages for required libraries are also missing. Unfortunately, it is often not specified directly which package has to be installed – this information must be > derived from the error message. For example,
llama.cppexpects thecurldevelopment files that are included in thelibcurl4-openssl-devpackage.
Download the models
Language models can be found on https://huggingface.co/. To use a model in llama.cpp, it must be in gguf format.
You can easily do the conversion yourself. For this purpose, llama.cpp includes the tools convert_hf_to_gguf.py and llama-quantize. For popular models, however, you can often find pre-converted models in gguf format on Huggingface.
Next there is the matter of deciding on quantization. With smaller quantization, the model consumes less vRAM, execution becomes faster, but this comes at a price of reduced performance. You can start with the largest version that fits into the vRAM and then reduce it if the speed is not sufficient. A 4-bit quantization is usually a good compromise: the vRAM is used efficiently while the losses from performance remain low.
We can load finished gguf files with the Hugging Face CLI tool, which can then be installed with the following command:
$ pip install -U "huggingface_hub"
Alternatively, one can use uvx to run the most current version of the tool directly. A corresponding alias might look something like this:
$ alias hf="uvx --from huggingface_hub hf"
The actual download to the current directory would look something like this:
$ hf download bartowski/Qwen_Qwen3-30B-A3B-GGUF --include "Qwen_Qwen3-30B-A3B-Q4_K_M.gguf" --local-dir .
Chat in the command line
llama.cpp provides a number of command line tools. With llama-cli you can directly start a chat:
$ llama-cli -m ~/models/bartowski/Qwen_Qwen3-30B-A3B-GGUF/Qwen_Qwen3-30B-A3B-Q4_K_M.gguf -co -cnv -fa -ngl 99
- -m: Path to the GGUF model file.
- -co: Colored output for better differentiation of input and output.
- -cnv: Activates Conversation Mode.
- -fa: Turns on Flash Attention (if supported).
- -ngl 99: Allows up to 99 model layers to be computed on the GPU.
The -ngl 99 parameter tells llama.cpp to handle up to 99 model layers on the GPU. In practice, this means that all layers are offloaded – as the output also confirms:
offloaded 49/49 layers to GPU If not all layers fit on the GPU, the remaining ones are processed on the CPU – which, as is to be expected, leads to significant performance losses.
Benchmarks
A main goal of this setup is to get a sufficient amount of vRAM at a reasonable price. But at the end of the day, we don’t just want to load huge models, we also want to execute them quickly. The rack should stand up to comparisons with what friends and colleagues put on their desks in terms of consumer hardware. A front-runner is the Apple Silicon M series, with its unified memory architecture. We use a detailed community benchmark of the various Apple products as our reference. Below is a test of a smaller model, Llama 7B v2. It can be run parallel multiple times on our setup, but the maximum speed is still crucial. With the tool llama-bench we determine two speeds:
- pp (prompt parsing): Reading the question/prompt
- tg (text generation): Generating the response
$ llama-bench -m llama-2-7b. Q8_0.gguf -m llama-2-7b. Q4_0.gguf -p 512 -n 128 -ngl 99 -fa 1
| model | size | params | backend | ngl | fa | test | t/s |
|---|---|---|---|---|---|---|---|
| llama 7B Q8_0 | 6.67 GiB | 6.74 B | CUDA | 99 | 1 | pp512 | 1024.05 ± 0.74 |
| llama 7B Q8_0 | 6.67 GiB | 6.74 B | CUDA | 99 | 1 | tg128 | 36.18 ± 0.01 |
| llama 7B Q4_0 | 3.56 GiB | 6.74 B | CUDA | 99 | 1 | pp512 | 1073.58 ± 0.35 |
| llama 7B Q4_0 | 3.56 GiB | 6.74 B | CUDA | 99 | 1 | tg128 | 55.80 ± 0.83 |
build: 578754b3 (5117)
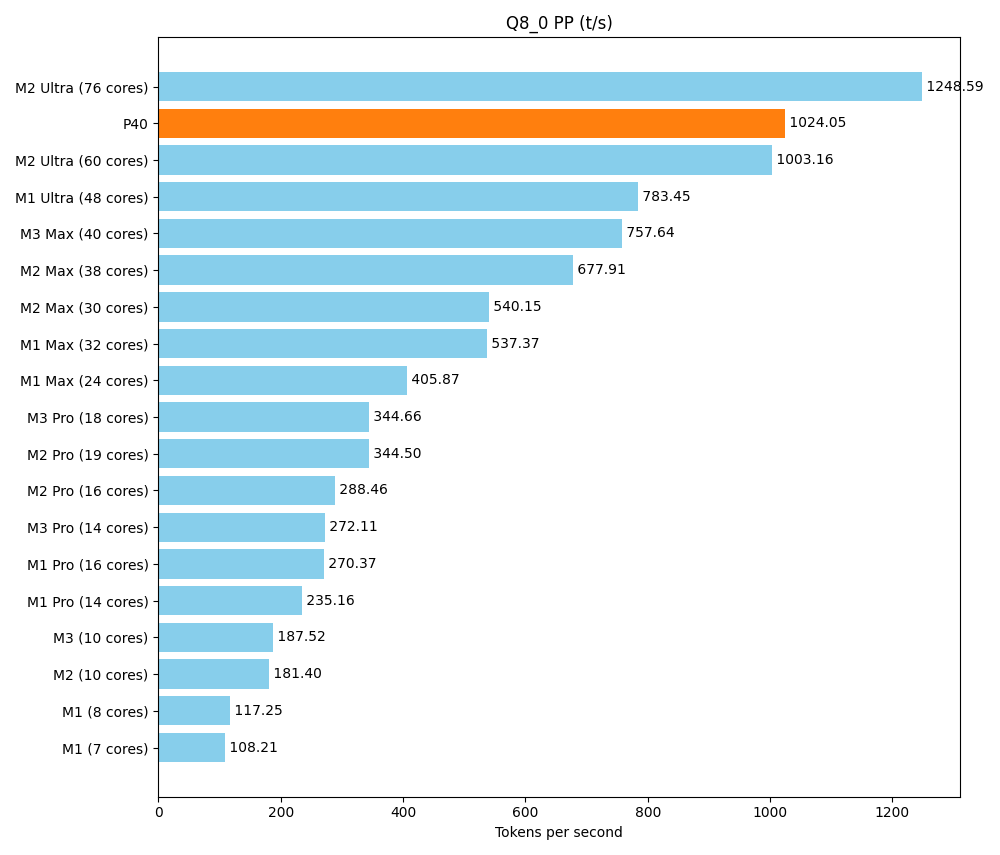
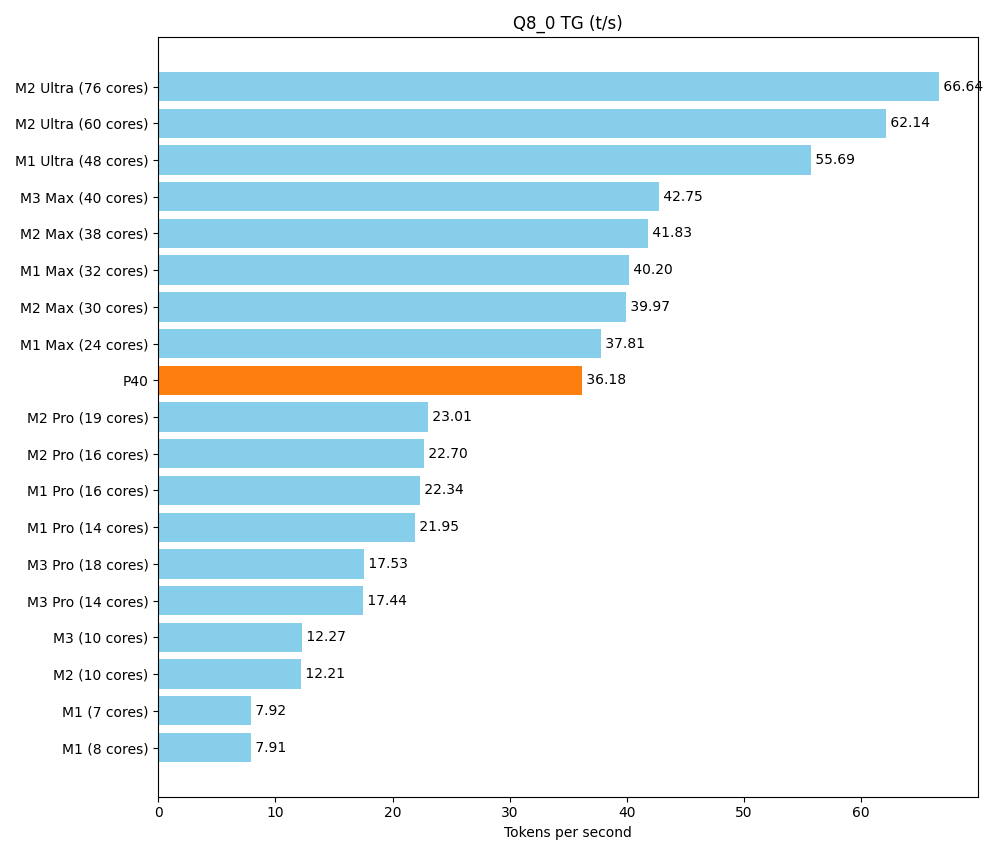
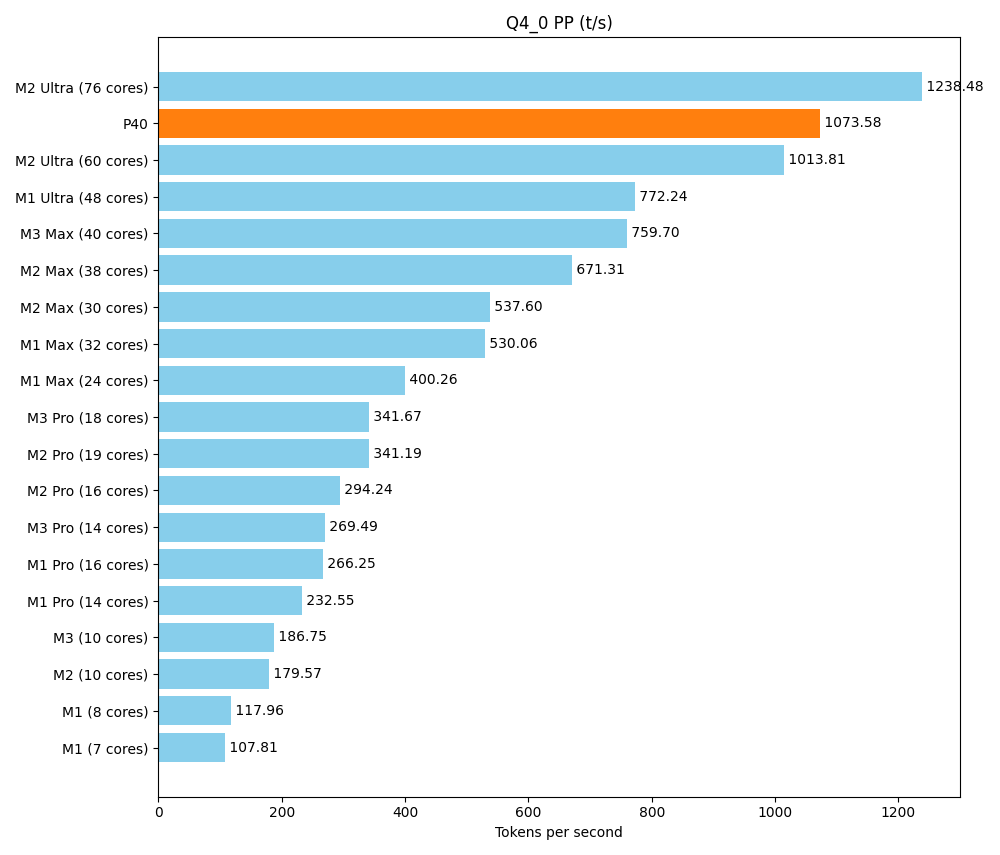
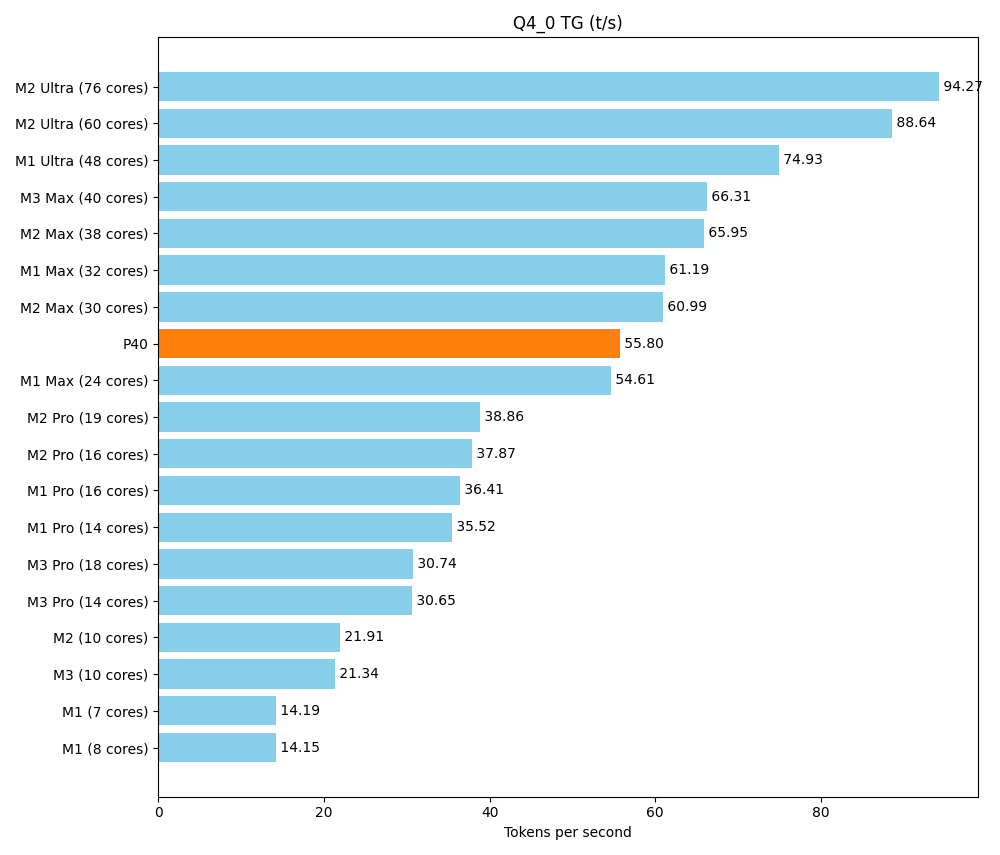
The P40 performs well in the area of prompt parsing. In text production, it is above the Pro series and in the lower range of the Max series.
Result
We have built a powerful HPC server with a total of 96 GB of vRAM, creating a solid basis for demanding AI and data processing projects – all without blowing the bank.
Rental server alternatives
Depending on the scenario, renting AI GPU servers might be a viable option. If you only need selective training phases or want to test prototypes on short notice, you can benefit from hour-based rental offers. However, long-term, continuous use requires dedicated resources with full access, and then the costs can add up quickly. It is not uncommon to see setups costing up to EUR 1,000 per month, which makes setting up your own server more economically attractive in the long run.
Practical framework
However, while operating a high-performance server has its advantages, it also has its infrastructural requirements:
- Space & volume: Under full load, a suitable server room with sufficient ventilation is required.
- Energy requirements: Continuous occupancy can result in electricity costs in the range of EUR 100 per month or more.
- Maintenance & updates: You are responsible for driver and software updates, as well as repair and replacement of defective hardware.
- Limited driver/software compatibility of used hardware: In our case, the P40’s “Pascal” GPU architecture was still supported well enough for us to run current models. However, we are already encountering deprecation warnings. Before purchasing, the current support for drivers (CUDA) and the important libraries and frameworks (especially PyTorch) should be researched.
Added value for the team
For our team, the current setup is a real asset:
- Free experimentation: No approval processes or time pressure from expensive rental hours.
- Data sovereignty: Local LLMs and AI models make it possible to securely process confidential data.
- Full control: We determine the hardware, the software and the access rights. Anything goes, no matter how obscure.