
Motivation
Many powerful AI models such as gpt-oss or DeepSeek are now published as open source. Powerful graphics cards (GPUs) are required in order to operate current and larger models at high performance. The decisive criterion here is the available graphics memory (vRAM). High-end gaming GPUs are equipped with up to 24GB of vRAM. However, this is not sufficient for larger language models. Professional cards such as the NVIDIA H100 Tensor Core GPU have 80 GB of vRAM, but currently cost around €30,000. Our goal was to build a machine learning computer on which medium-sized models could be operated locally without using cloud providers, which would be as powerful as possible, but on a manageable budget. The choice fell on a Dell PowerEdge C4130 rack server with two Nvidia Tesla P40 GPUs, 64 Xeon cores, 128GB RAM and 800GB hot-swap disks. The acquisition costs for the used hardware amounted to a total of 1550 €. In 2020 the P40 GPUs were in the upper performance class and continue to be provided with driver updates by Nvidia. How their performance has stood the test of time is revealed in the benchmarks in the second part of the article. For now we’ll describe the structure of the basic system without starting up the GPUs. The goal is to create a working environment that can be operated completely without physical access. The server hardware has some interesting featutres which allow such access, and we will now take a closer look at these features.
Initial assessment
The chassis of the C4130 is designed for mounting in a 19” rack, with a height unit (1U) and a depth of almost 90cm. It has 2 redundant 2 kW power supplies, one of which unfortunately suffered damage during shipping.
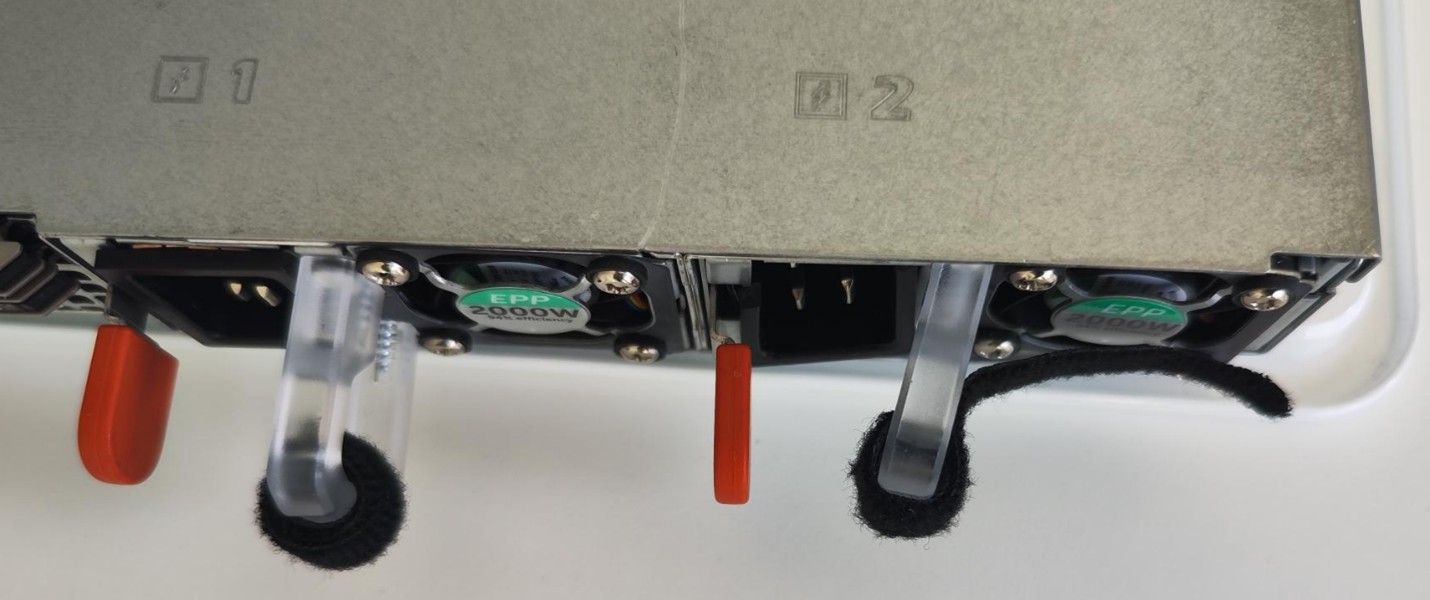
While we had no issues with the seller exchanging the damaged goods, the matching C19 power cables were not included and had to be reordered.
The machine is completely designed for remote maintenance, so it usually no longer requires on-site presence after installation in the data center. It also has 2 Gigabit Ethernet ports and a maintenance port. It can be accessed via VGA and USB, but we do not use this due to the lack of a suitable VGA adapter. The handbook documents the various access routes.
When switched on for the first time, the LEDs on the front and back of the chassis flash orange. Ideally they should be solid blue, so the system doesn’t feel completely healthy.
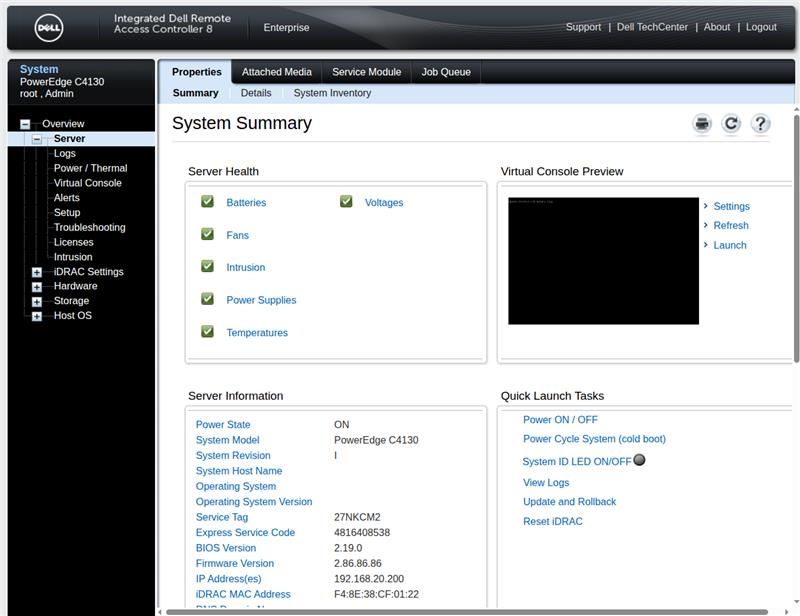
The maintenance access (iDRAC) has a somewhat old-fashioned web interface on the factory-set IP 192.168.0.120. Commendably, you can use the maintenance port on a switch as well as on a laptop (auto-sense), for which you have to manually select an IP address on the same LAN as the laptop.
The iDRAC is completely independent of the main system and can be accessed as soon as the chassis receives power. In the diagnostics area, the condition of all components is visible. In our case, as expected, the removed power supply is flagged, and a fan is also defective, which is why the status LEDs flash orange.
Speaking of fans: There are 8 built-in cooling units, each with 2 fans. Due to the low height (1U is about 4.5cm), they already spin at idle at 8,000 rpm. The limit is about 20,000 rpm, which is unpleasantly loud. Colleagues present in the room quickly left after it had been switched on.
Other interior features: a 128 GB main memory, 64 cores in 2 Xeon E5-2697A processors, and two 800 GB hot-swappable SSDs (1.8” uSATA).
When you remove the lid of the chassis, your eye is immediately caught by the 4 GPU bays directly in front of the fans. There are several slots free for more main memory, and there is still room for more hard drives at the back. The opening and reclosing of the chassis is logged by the iDRAC, even when it is switched off.
In the iDRAC there is a VNC console which allows access to the BIOS and other diagnostic tools. We performed a detailed memory test, which ended after several hours without returning any errors.
Before the first boot of the main system, we change the boot order in the BIOS and disable the default network start (PXE). Thanks to this we avoid long pauses at startup.
Before you can turn your attention to GPUs, a basic operating system is required. The choice fell on Ubuntu because it is both commonly used and supplied by Nvidia with current GPU drivers and libraries. We are looking for:
Encryption on both SSDs (cryptsetup + LUKS);
LVM with 2 physical volumes;
and within it logical partitions for /, /var and /home.
We decide against RAID1 on the hot-swappable disks in favor of more usable space for our AI models.
We start the Ubuntu server installer from a USB stick and access it via the VNC console in iDRAC. Caution is advised when entering passwords during installation: The keyboard layout of the VNC viewer in the iDRAC console is neither German nor English, but instead a wild mixture.
We noticed that the VNC console didn’t not run stable, with the connection not always working. A cold start might help.
The Ubuntu installer is somewhat overwhelmed with our partitioning requests: it apparently fails because the two encrypted disks are to be combined into one LVM volume (LVM = Logical Volume Manager). We work around the problem by initially setting up only an encrypted SSD with an LVM root volume. This means that the initial installation is complete within 5 minutes after a reboot.
LVM allows us to change volume sizes in the file system relatively easily afterwards, as well as to include additional disks. The necessary connections are already available in the chassis.
Manual setup of the second hard drive
We would like to have /home on the second (still unformatted) disk /dev/sdb, as we want to have plenty of room for our AI models. To do this, we create an encrypted partition:
# parted /dev/sdb mklabel gpt
# parted -a optimal /dev/sdb mkpart primary 0% 100%
# cryptsetup luxFormat /dev/sdb1
To be able to unlock both disks with the same password, we use the script decrypt_keyctl (included in cryptsetup). It takes keyctl from the keyutils package, which we however still need to install manually. Then it is entered in /etc/crypttab for both disks:
# apt install keyutils
# cat /etc/crypttab
dm_crypt-0 UUID=035c6de5-99df-4e81-ba49-578d6b97c4cf none luks,keyscript=decrypt_keyctl
crypt_sdb1 UUID=97675b26-983a-42f8-8e2c-a5edb0fb051f none luks,keyscript=decrypt_keyctl
# update-initramfs -u
# reboot
The next time the machine is restarted, both disks are decoded as planned. We occupy the now available space entirely with /home in another physical LVM volume. In theory, LVM could be dispensed with for a single partition, however it allows us to change the distribution of the disks later if necessary.
# pvcreate /dev/mapper/crypt_sdb1
# vgcreate data-vg /dev/mapper/crypt_sdb1
# lvcreate -n data-home -l 100%FREE data-vg
# mkfs.ext4 /dev/data-vg/data-home
# cat /etc/fstab
...
/dev/disk/by-uuid/8209347b-0ddd-47f8-a5ba-b505cb822085 /home ext4 defaults 0 1
Normally, the password for encrypted hard drives is required at system startup. However, this will no longer be accessible as soon as the machine is placed in the rack. We therefore install dropbear-initramfs to be able to unlock the disks via SSH.
Deviating from usual procedure, we convert the existing OpenSSH host keys to Dropbear format and install them in initramfs, so that we can use the normal SSH port (22) for unlocking without causing any key conflicts.
# /usr/lib/dropbear/dropbearconvert openssh dropbear \ /etc/ssh/ssh_host_ecdsa_key \ /etc/dropbear/initramfs/dropbear_ecdsa_host_key
# /usr/lib/dropbear/dropbearconvert openssh dropbear \ /etc/ssh/ssh_host_ed25519_key \ /etc/dropbear/initramfs/dropbear_ed25519_host_key
# /usr/lib/dropbear/dropbearconvert openssh dropbear \ /etc/ssh/ssh_host_rsa_key \ /etc/dropbear/initramfs/dropbear_rsa_host_key
Finally, the public keys of all administrators are entered in /etc/dropbear/initramfs/authorized_keys and the ramdisk is updated:
# update-initramfs -u
# reboot
Et voilà, after a reboot, the disks can be unlocked via SSH.
Compulsory reworking
During the final system cleanup, we stupidly overlooked the fact that cryptsetup-initramfs is not a manually selected package and it is automatically uninstalled. As a result, the system no longer boots because the root partition cannot be decrypted.
Luckily a rescue system is hidden in the help menu of the Ubuntu installer. From there, we manually mount the installed filesystem and reinstall cryptsetup-initramfs in the chroot. Now the machine starts again.