SwiftUI is Apple’s new framework for developing user interfaces. For this purpose, it could become more popular in the long run than UIKit on iOS and iPadOS. The same applies to UIKit on tvOS, AppKit on macOS, and WatchKit for watchOS. The first SwiftUI version was presented at Apple’s Worldwide Developer Conference 2019. This year at WWDC 2020 the next iteration was announced, with which developers can develop apps for the newly released operating systems macOS 11 and watchOS 7 as well as iOS, iPadOS, and tvOS 14. An advantage of this innovation is that developers only have to learn one framework to implement UIs for all these platforms. You can even develop multi-platform apps that share a code base to run on iPhones, iPads, and Macs. This blog post is the first in a series that explains what SwiftUI is and how to migrate an existing UIKit-based app to SwiftUI.
Imperative and Declarative Programming
The switch to SwiftUI brings some new concepts with it. The most prominent change is the change of the programming
paradigm from imperative to declarative programming. What does this mean? In the imperative UIKit world for example
a UIView is assembled by commands (e.g. addSubview(\_:) to embed a UIView into a parent view
or setImage(_ image: UIImage?, for state: UIControl.State) to change the image of a UIButton). So a sequence of
actions is implemented to make the user interface look like it should. The following example shows how a button that is
supposed to toggle dark mode in an app could be imperatively implemented using UIKit:
var settings = SettingsStore()
var darkModeButton: UIButton!

override func loadView() {
    view = UIView()

    darkModeButton = UIButton()
    darkModeButton.addTarget(self,
                             action: #selector(onDarkModeTapped),
                             for: .touchUpInside)
    updateDarkModeButton()
    view.addSubview(darkModeButton)

    // ...
}

@objc private func onDarkModeTapped() {
    settings.darkMode.toggle()
    updateDarkModeButton()
}

private func updateDarkModeButton() {
    if settings.darkMode {
        darkModeButton.setImage(UIImage(systemName: "sun.max"),
                                for: .normal)
    } else {
        darkModeButton.setImage(UIImage(systemName: "moon"),
                                for: .normal)
    }
}
Within the loadView() method of a UIViewController, a UIView and a UIButton are created and the latter is
inserted into the view using addSubview(_:). If the button is tapped, the setting should be inverted. Therefore,
the darkMode property in the SettingsStore model is adjusted when calling the onDarkModeTapped() method. To
display the button according to the current dark mode setting, the updateDarkModeButton() method is called and the
image of the button is set to a sun or moon icon using setImage(_:for:).
The declarative approach of SwiftUI works by describing the appearance of the user interface depending on the status of one or more data models. The following example shows how this could be implemented:
@ObservedObject var settings = SettingsStore()

var body: some View {
    Button(action: {
        self.settings.darkMode.toggle()
    }) {
        if self.settings.darkMode {
            Image(systemName: "sun.max")
        } else {
            Image(systemName: "moon")
        }
    }
}
Depending on the current status (self.settings.darkMode) the button is displayed as a sun or a moon. Utilizing
the @ObservedObject property wrapper allows the user interface to be automatically redrawn whenever
the SettingsStore model changes.
The declarative solution has the advantage that it is easier to read and understand, while usually being more compact than a comparable UIKit approach.
Requirements for Using SwiftUI
So how can interested developers use SwiftUI to develop user interfaces? First, Apple’s development environment Xcode 11 or newer is required. Furthermore, macOS Catalina or newer should be installed to use the preview feature. This allows you to see a live preview of the resulting user interface next to the SwiftUI code. Finally, iOS/iPadOS 13 or newer must be selected as the deployment target. Depending on the app, this could be an exclusion criterion if it should be compatible with older devices. During the WWDC in June 2020 Apple published current figures on the distribution of operating system versions. Thus version 13 of the operating system is installed on 81 % of the iOS and 73 % of the iPadOS devices. Considering only the devices that were released in the last four years, the figures are 92 % and 93 % respectively.
The easiest way to get started with SwiftUI development is to create a new project. But what about already existing apps? These can also benefit from SwiftUI because it is possible to use UIKit and SwiftUI in the same project and link them together. How this can be done is described below using the cronn Image Recognition Playground App as an example. The app allows the collection of photos of different objects and to use them to train a neural network. The trained model can then be used to classify images captured by the camera in real-time. For example, some photos of hot dogs and donuts can be taken to train a classifier. The app should then detect when a hot dog or donut appears in front of the camera of the device and distinguish which object it is.
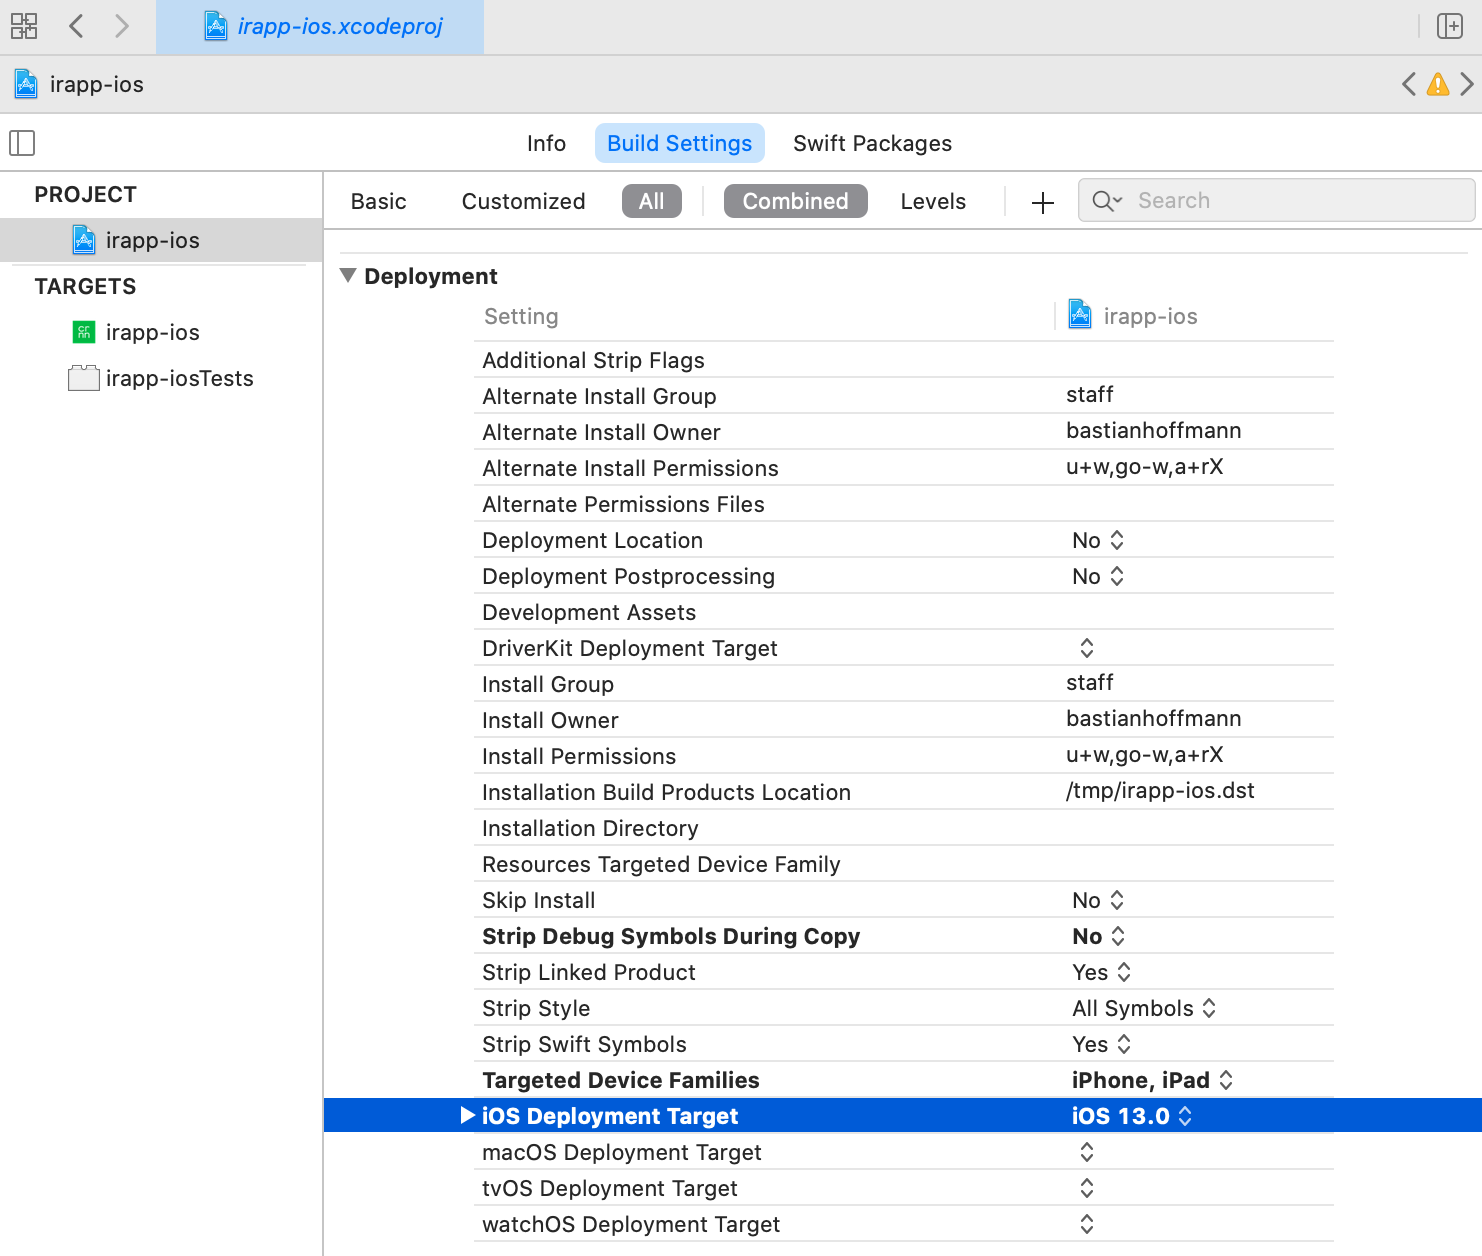
To customize the deployment target, use the project navigator in Xcode and select the project to open
the <project name>.xcodeproj file. Then select the project again in the left bar, choose Build Settings in the top
bar, and finally set the iOS Deployment Target in the Deployment category to iOS 13.0 or later.

This was the first part of the blog post series about SwiftUI. The next post will be about the integration of SwiftUI code into an existing UIKit project.

