Yolo?
No, I don’t refer to the typical abbreviation when talking about YOLO, but YOLO the neural network which can be used for object detection. In this article we will show you what object detection is in the first place, how neural networks for object detection work and how you can teach YOLO to detect players from the video game VALORANT.
Computer vision
Computer vision is, as you can already tell by the name, the ability of computers to see. They can evaluate images and extract information in digital form from those images, for example detecting, identifying and outlining objects. When detecting more complex objects, e.g. the player in Valorant you often use artificial intelligence, or more precise, neural networks.
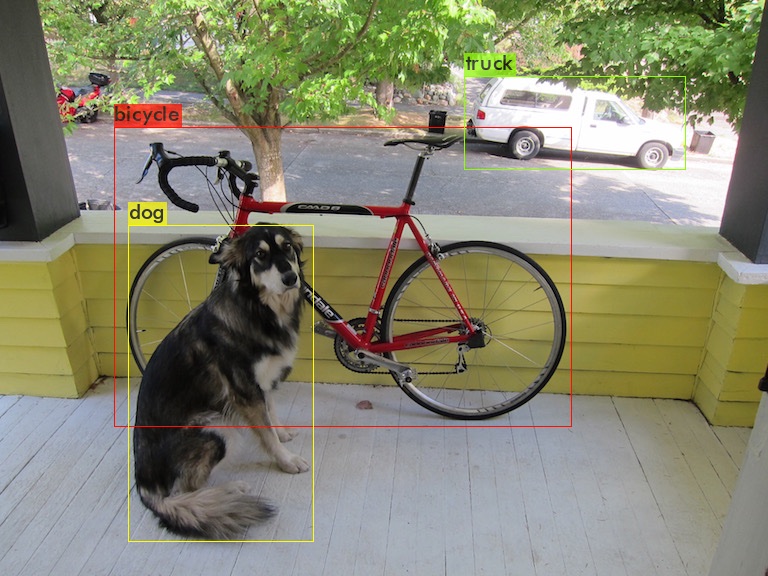
dog.jpg: Predicted in 23.210000 milli-seconds.
bicycle: 91%    (left_x:  114   top_y:  127   width:  458   height:  299)
dog: 98%        (left_x:  129   top_y:  225   width:  184   height:  316)
truck: 92% (left_x: 464 top_y: 76 width: 221 height: 94)(Source: darknet repository)
YOLO!
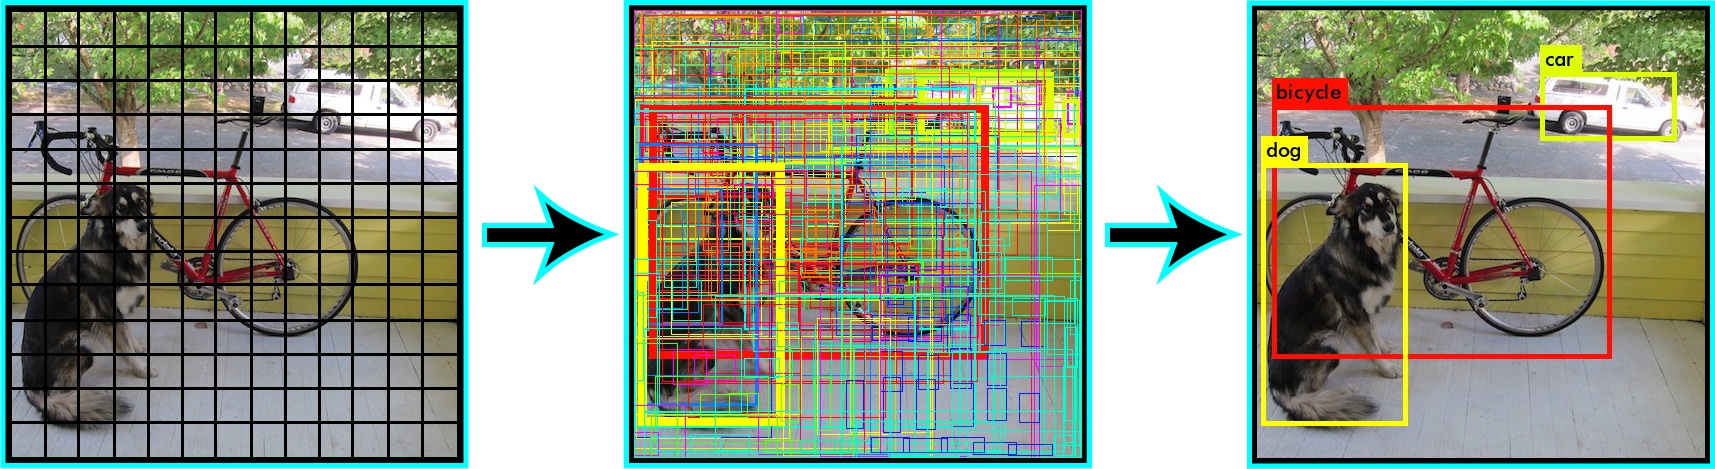
YOLO is one of those neural networks: You input an image into the neural network and it will return a list of detected objects containing the name (class) of the object, the position (bounding box), and the probability that the object is identified correctly. You can find an example of such a list below. The biggest advantage of YOLO is its fast detection (short inference time), as you can already tell by the name of the software “You only look once”. Other detection systems, for example R-CNN, apply the neural network to lots of image details with varying sizes and then select the highest scoring detail as a bounding box. But because there are always round about 2000 details per image the detection takes much longer. YOLO on the other hand “looks” at the image only once and then decides where the objects are. When detecting objects YOLO separates the image into a grid and then predicts for each tile the class which is in that tile and the confidence of the neural network that there actually is an object in that tile. So if you set the confidence threshold to for example 30% you will get quite promising results.
(Quelle: YOLO site)
Apart from the fast inference this method also has the advantage that the neural network can gain information for the predictions based on the whole image and not only based on the detail, which it is currently looking at. One of the consequences of only looking once at the image is the worse accuracy of the network’s predictions in comparison to for example R-CNN. Another problem arises due to the separation of the image into a grid: Because of YOLO only making one prediction per grid it cannot detect small objects very well. So if you for example want to develop an application that is able to count birds in a flock of birds, you should not use YOLO. In case of the enemy detection in Valorant YOLO is a good thing to use, because A) we want an as fast as possible detection B) the players are most of the time big enough drawn on the screen.

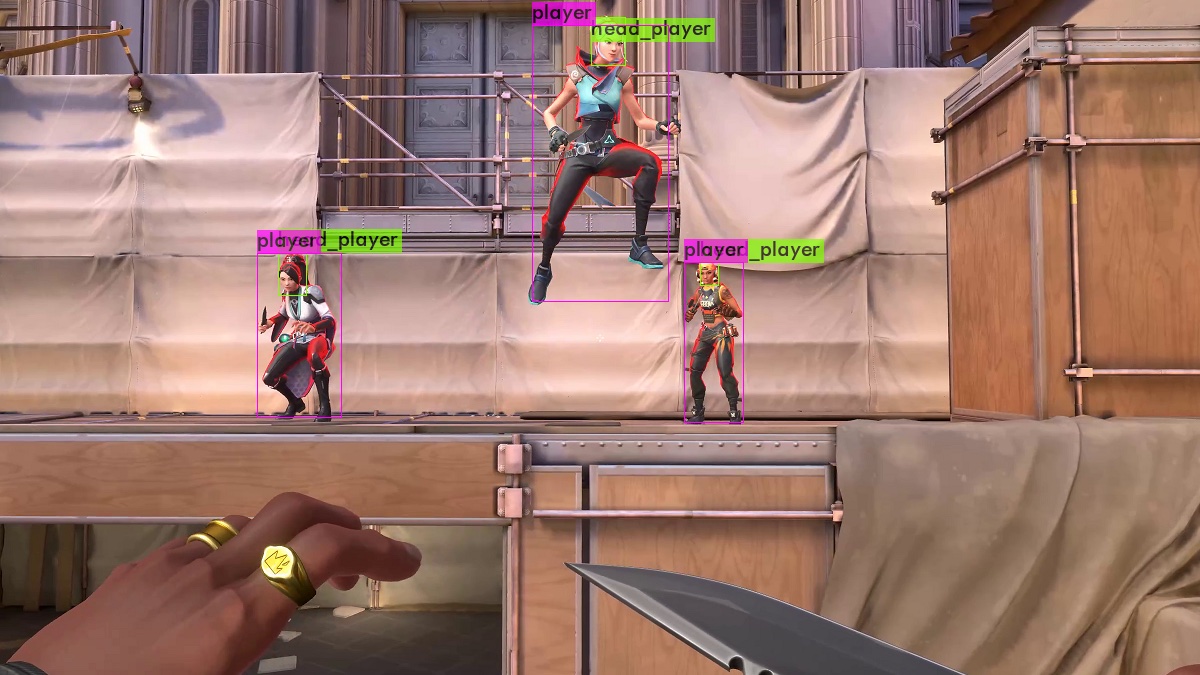
Source: Image taken from the video game Valorant
How you teach YOLO to detect enemies in VALORANT
As we just saw we can use YOLO in our case, but we still have to get YOLO to learn to detect the enemies. We primarily
need three things to train a neural network: A lot of training data, a lot of computing power and a lot of time. The
training data contains a lot of training pairs which consists of an image and a corresponding text file which contains
the objects that the neural network should detect and its positions. Those text files always consists out of one object
per line:
<object-class_id> <x_center> <y_center> <width> <height>
Where:
<object_class_id>is the class of the object (e.g. player = 0 and head_player = 1)<x_center> <y_center>is the center of the bounding box relative to the width and the height of the image ( accordingly values from 0.0 to 1.0)<width> <height>are the width and height of the bounding box relative to the width and the height of the image
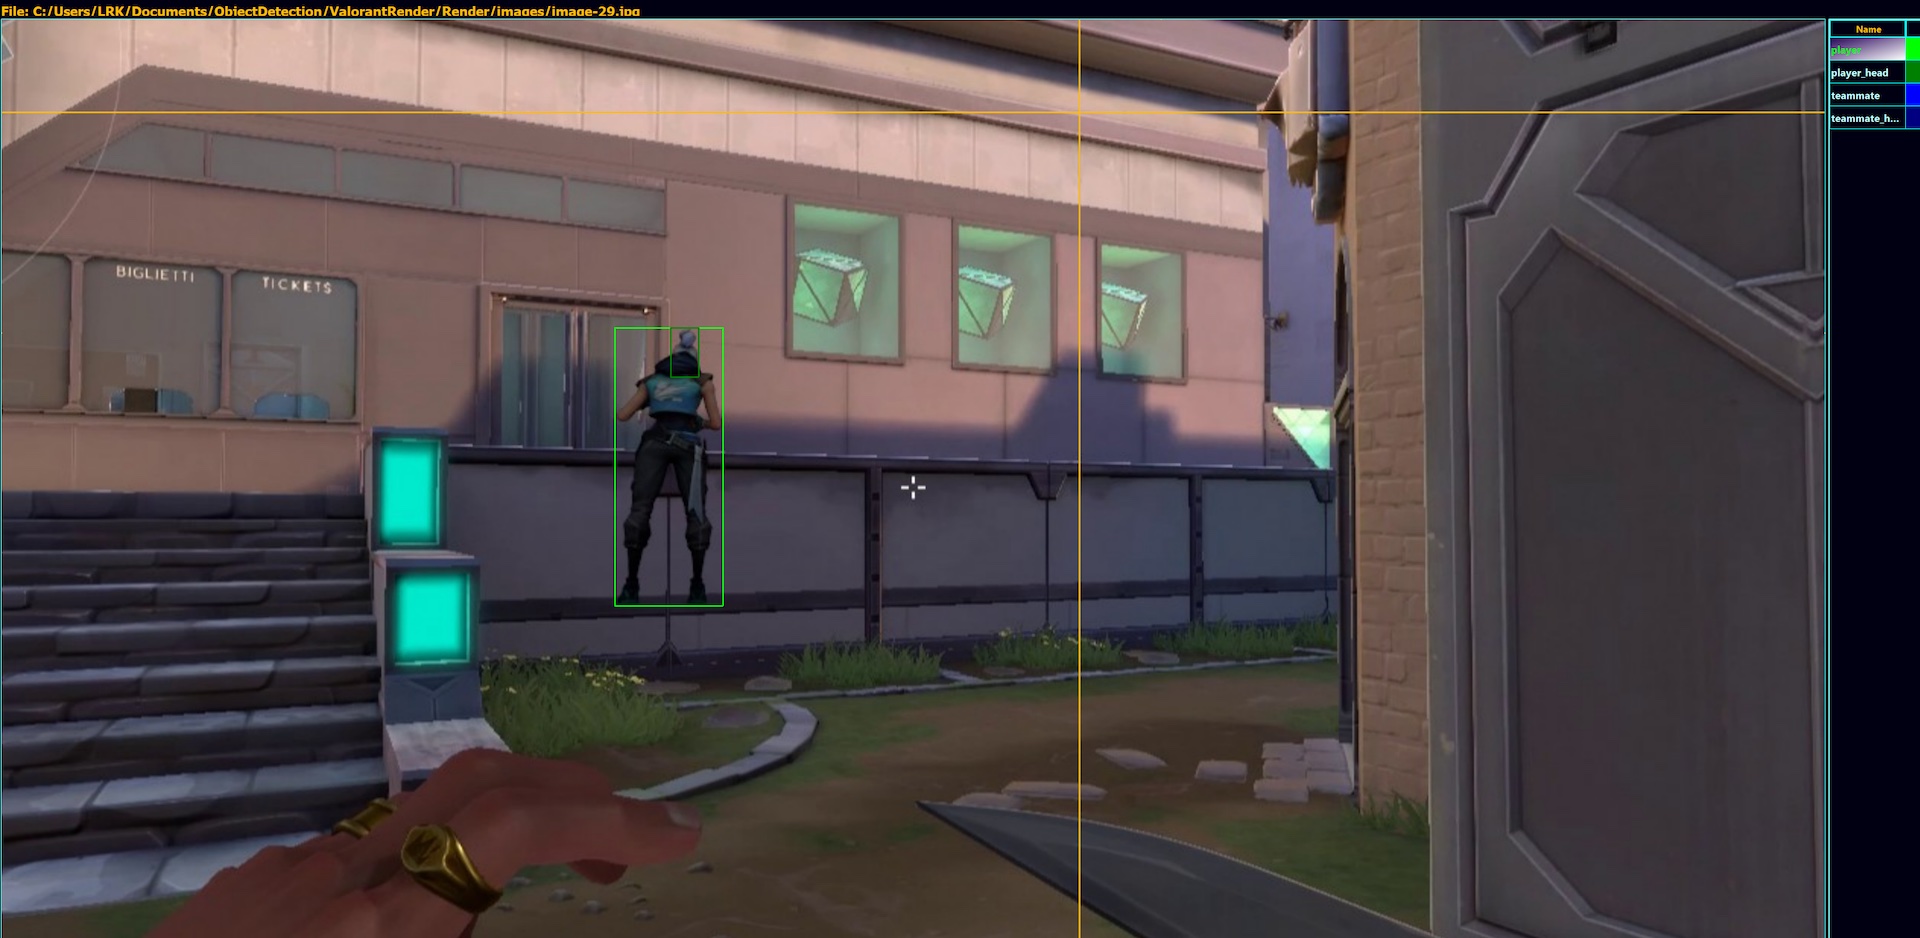
Source: Image taken from the video game Valorant
0 0.365966 0.477610 0.059402 0.296767
1 0.374505 0.355427 0.015204 0.052402
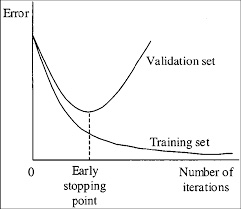
During the training YOLO looks at the images in stacks, predicts the bounding boxes and corrects its weights (the internal settings which determine the behavior of the neural network) afterwards so that the next prediction will be closer to the desired prediction for this pair of training data. This procedure ist just being repeated X times (X iterations) during the training. With each iteration the difference between the desired prediction and the current prediction reduces (the so-called loss). The smaller the loss gets the more “entrenched” (and less flexible) the neural network is. An extremely low loss results in a network that can detect the objects on the training images very good but can’t really detect the objects on other (to the neural network unknown) images. The opposite of the entrenched neural network mentioned above (“Overfitting”) is called “Underfitting”. If a neural network is underfitted, the neural network detects objects with a low confidence and also detects lots of objects incorrectly (false-positives). The ability of the neural network to detect the objects it has learned via the training images on new images is called generalization. In its optimal state the network should have a healthy mix between precision when detecting and generalization. There is a rule of thumb to roughly know when this optimal state is reached and therefore when you can/should stop the training: about 2000 iterations per class, but at least 6000 iterations. If you want to know more precisely when to stop the training you need to have apart from the trainings’ data also validation data. This data is constructed in the same way as the trainings’ data: it also consists out of lots of pairs of text-files and images. With the only difference that the neural network does not use the validation data for training but only for validation. Every 100 iterations the network predicts the objects on the validation images and calculates the accuracy of its predictions which is measured as for example the mAP. To find the right point in time to stop the training it can help to take a look at a graph of a typical training.
(Source: darknet repository)
You can see how the loss/error for the trainings’ data decreases during the trainings process (the network improves on detecting the objects on the training images). The error of the neural network when predicting the objects on the validation set (a collection of images that the network hasn’t seen yet) on the other hand, only decreases till the “Early Stopping Point” is reached. After that point the network gets worse at generalizing and can at some point only detect images of the trainings’ dataset (only in some very extreme cases). That’s why should stop the training when this “Early Stopping Point” is reached.
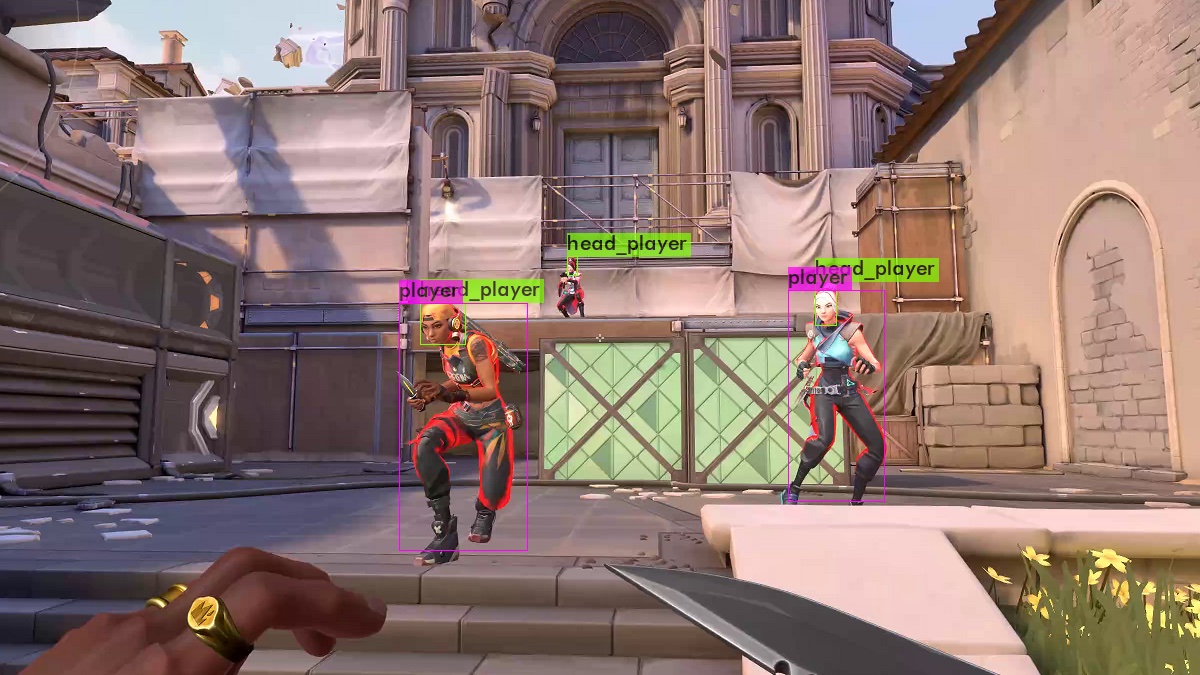
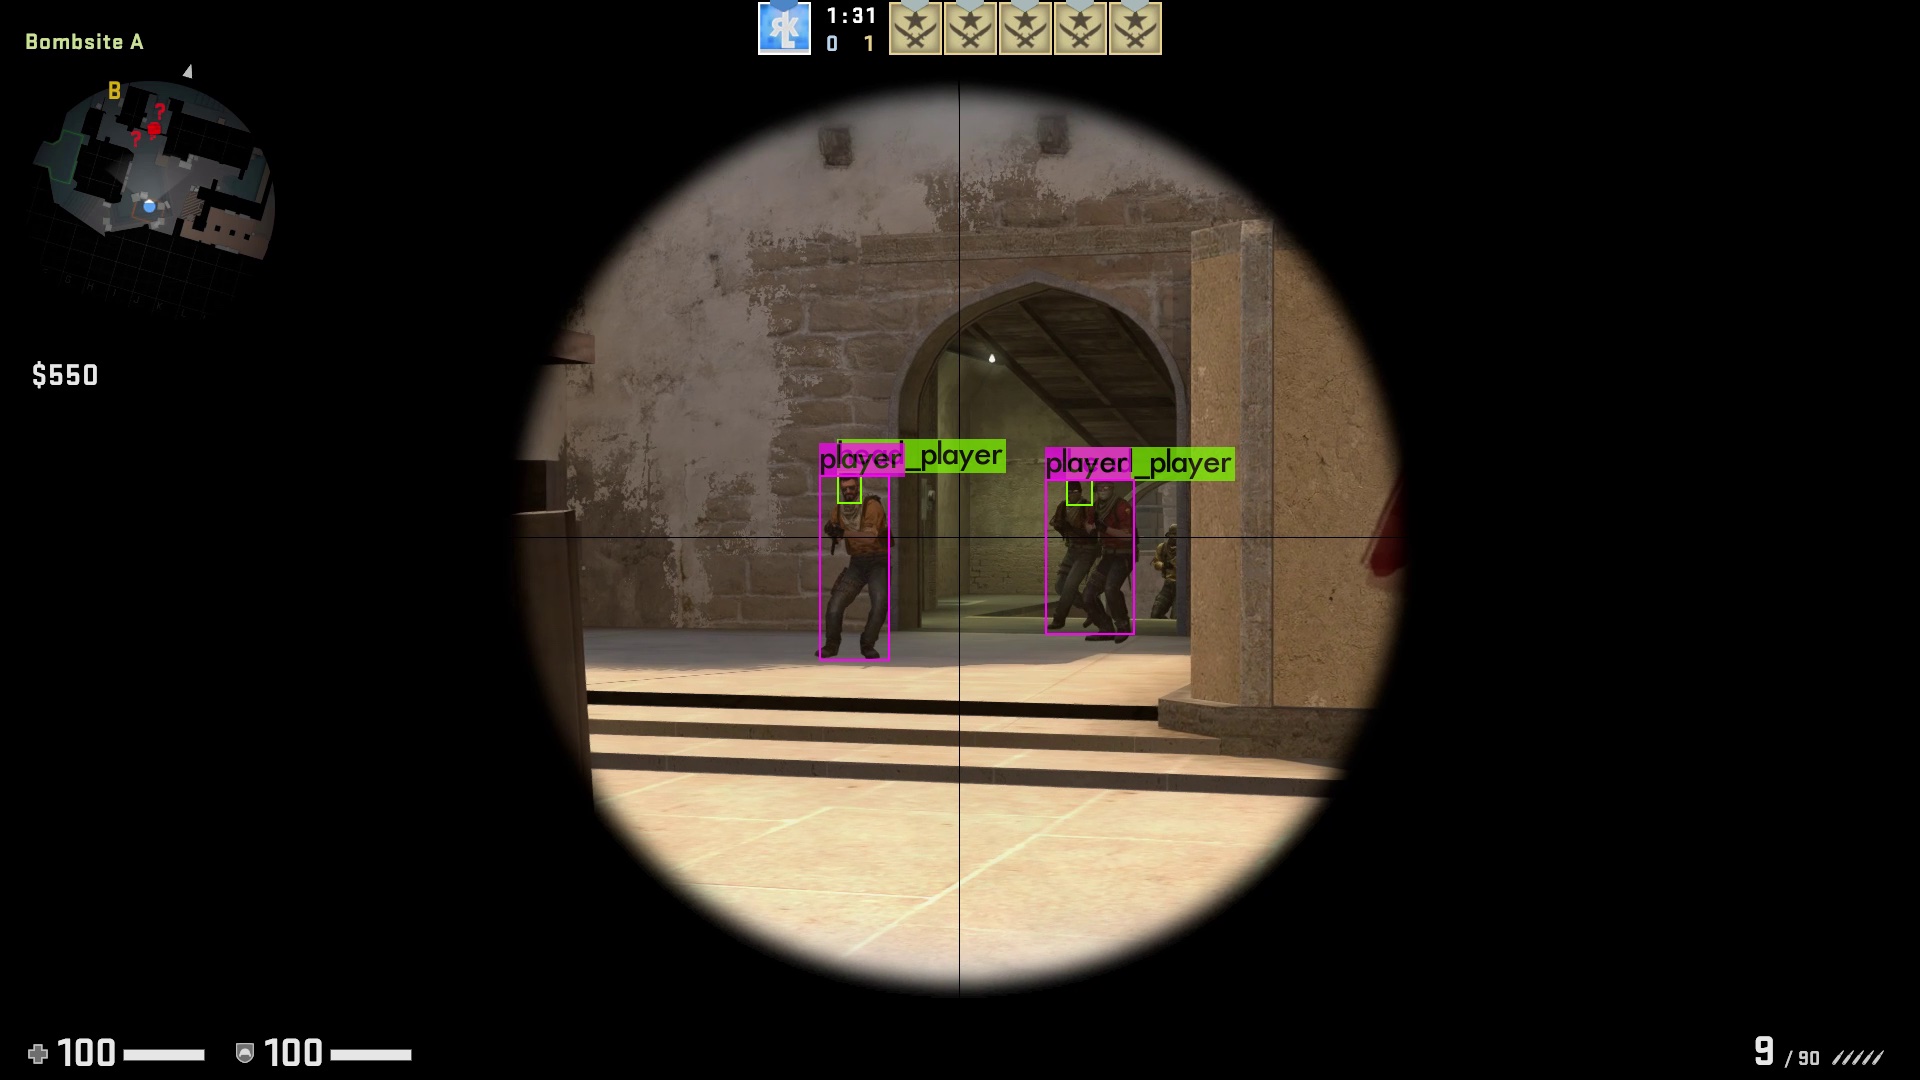
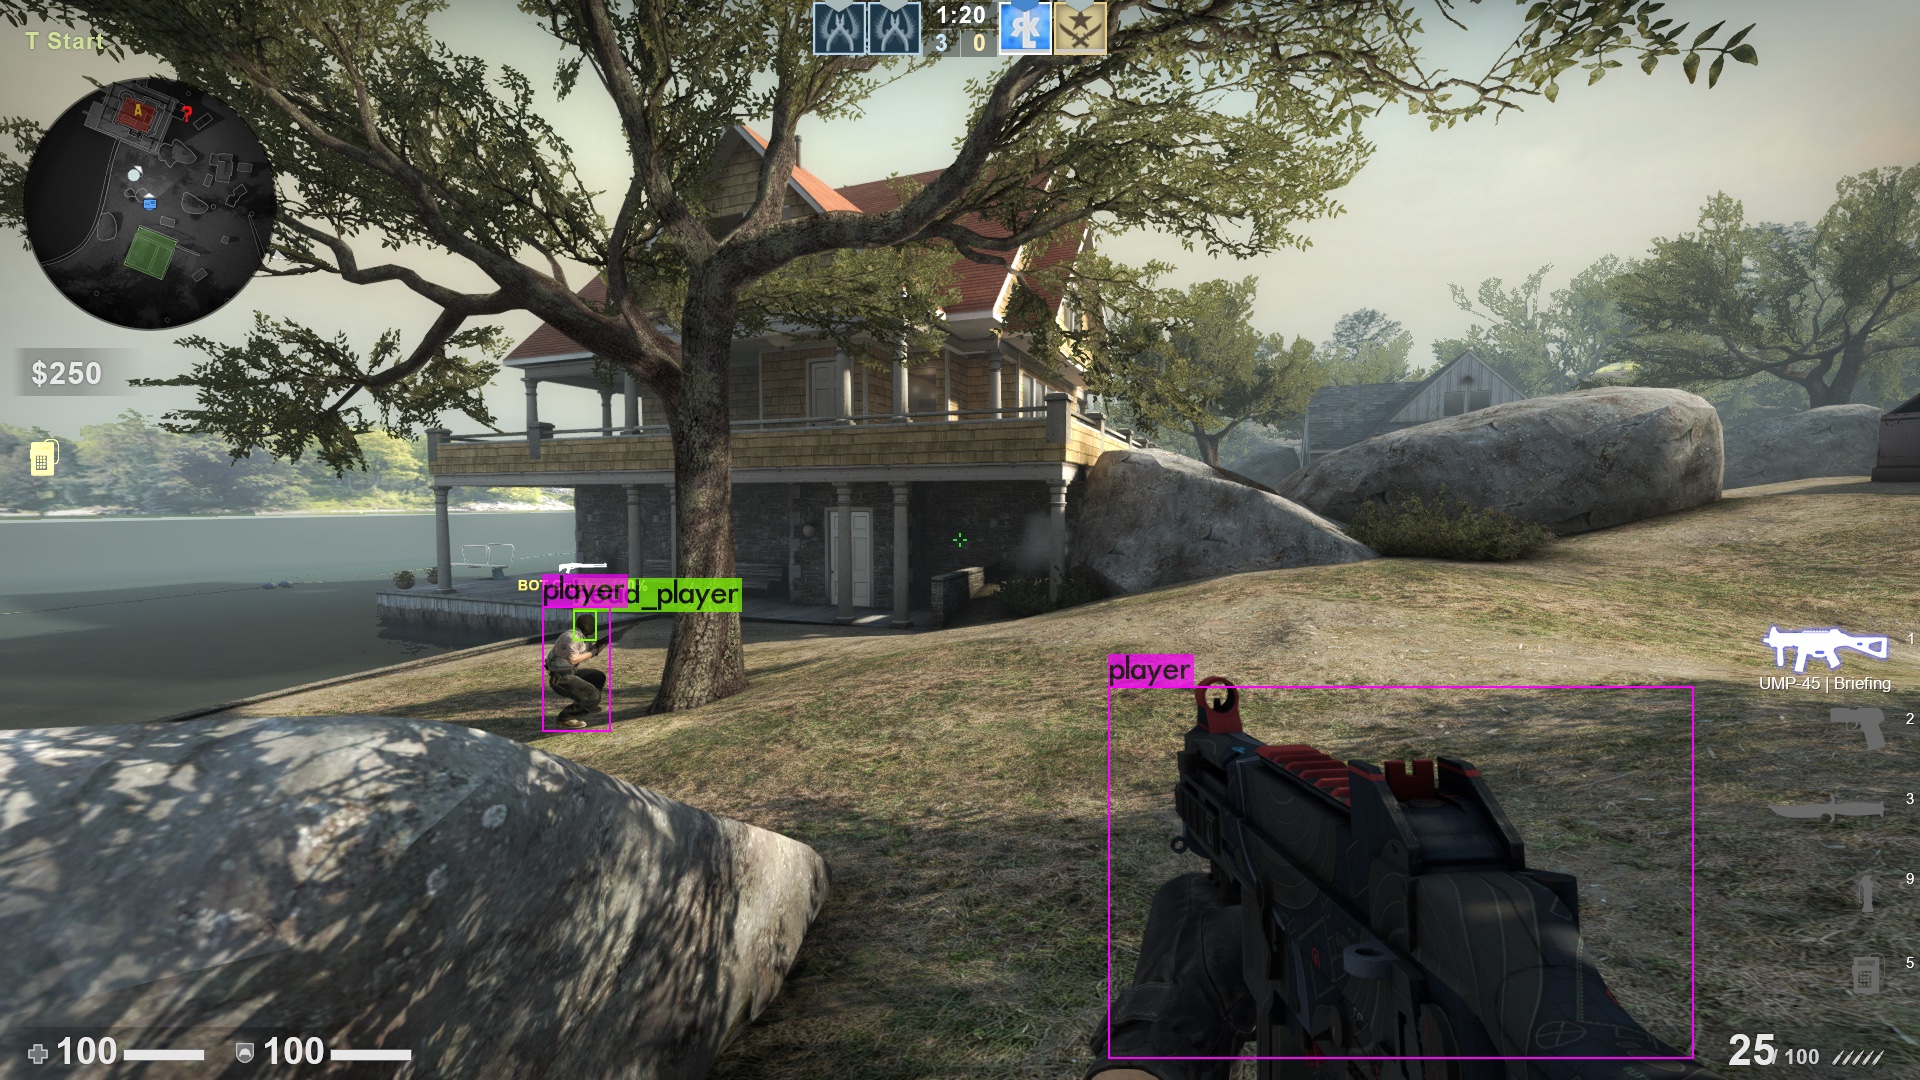
When training YOLO for the player detection I already stopped the training after 3000 iterations. Not because the early stopping point was reached but because I was too impatient :). The training takes time, lots of time: it took 12 hours for my computer to train 3000 iterations - and my network should only detect 2 classes (player and their heads). If you want to train a neural network which should detect 80 different objects as for example for the reference trainings set COCO, the training can also take multiple days. But as for every problem there’s also a solution for that one: The bigger your graphic memory is the more images YOLO can look at once, the faster it therefore is. So it’s time for you to buy a new graphics card! After training, it is time to evaluate the results. As you can see below, the results are quite promising despite the short training time. But you can still tell that the neural network is underfitted by another aspect: If you input images of another video game (in this case CS:GO) into the neural network, it still detects players even though they look different from the players in Valorant. In the second image you can especially see that the player on the right side has been detected correctly but on the left side the gun has been classified as a player.
Implement the enemy detection in an example application
To be able to evaluate our neural network better, we will write a small C# application which captures a certain area of our screen, applies the neural network to that area and presents the detection results in a window. Before we can start we have to make sure all requirements for the detection are fulfilled (a list of requirements can be found here). At first, we will of course have to load our neural network. To load and to detect objects later on we use the Alturos.Yolo Wrapper:
Console.WriteLine("Starting YOLO object detection ...");
var gpuConfig = new GpuConfig();
var yoloConfig = new YoloConfiguration("yolov4-valorant.cfg", "yolov4-valorant_last.weights", "valorant.names");
using (var yoloWrapper = new YoloWrapper(yoloConfig, gpuConfig))
{
Furthermore, we need a main loop in which
- we capture the certain area of the screen
Rectangle capRegion = new Rectangle(1920 / 2 - 1200 / 2, 1080 / 2 - 675 / 2, 1200, 675); Bitmap bmp = cap.CaptureRegion(capRegion); - our neural network predicts the player bounding boxes on that image
byte[] jpgBytes = (byte[]) new ImageConverter().ConvertTo(bmp, typeof(byte[])); var items = yoloWrapper.Detect(jpgBytes); - and we draw the predictions on the image and display it
using (Graphics g = Graphics.FromImage(bmp))
{
 if (items.GetEnumerator().MoveNext())
 {
     foreach (var item in items)
     {
         Color color = Color.Black;
         switch (item.Type)
         {
             case "player":
                 color = Color.LawnGreen;
                 break;
             case "head_player":
                 color = Color.Red;
                 break;
             }

             g.DrawRectangle(new Pen(color), item.X, item.Y, item.Width, item.Height);
             g.DrawString(item.Type + "(" + Math.Round(item.Confidence * 100) + "%)",
                 new Font(FontFamily.GenericMonospace, 15), new SolidBrush(color), item.X, item.Y);
         }
     }
 }
 form.pictureBox1.Image = bmp;
If you want to you can add an FPS (frames per second) counter to the application to be able to measure the performance. Doing that you have to keep in mind, that this example application is far from a performance optimized application (neither the object detection, nor the screen capture). You can implement the counter simply using a stop watch, which resets in the beginning of each new iteration, stops at the end of each iteration and is then being displayed.
Stopwatch watch = new Stopwatch();
watch.Restart();
watch.Stop();
g.DrawString((1000 / watch.ElapsedMilliseconds) + "FPS (" + watch.ElapsedMilliseconds + "ms)",
    new Font(FontFamily.GenericMonospace, 15), new SolidBrush(Color.LimeGreen), 10, 10);
The only thing missing for our application to work is a small piece of code: You probably didn’t miss
that cap.CaptureRegion(capRegion) uses the variable cap which doesn’t exist yet. This variable is declared above
the loop
cap = new ScreenCapture();
and is an object of our own class ScreenCapture. I won’t go into detail on this class because it simply does what
the name refers to: capture the screen. If some of you want to know some more about that class, you can find the
corresponding article which I used to write the
class here.
Great, you did it! The application should now be fully functional and able to detect enemies on your screen. You can find more information about the requirements and the complete source code here. All of you who don’t want to or don’t have enough time to build and try the project yourself, can find a demo video of the application here.