
Introduction to code generation
Developers often find themselves confronted with writing the same type of simple code over and over again. Over time, some options were designed to reduce the time needed for writing trivial code. IDEs can automatically generate getters and setters or even apply custom templates that can be used for code generation. Elaborate tools like the OpenAPI Generator 1 are able to create the groundwork for client and server code in REST-based communication by using the interface specification as input, and even more recently elaborate AIs have been launched with this purpose in mind. In general, there are two different types of generating code: one time generation, like the getter and setter creation from IDE, and continuous generation, like the OpenAPI generator. In the latter, a change of interface specification directly results in changes in the generated code, and thus specification and code remain in sync.
Java annotation processing, which was introduced in Java 1.6, is another example of continuous generation. The main idea is that a code generator operates on specific parts of the code which is marked by annotations. These annotations are then processed in the generator, where new code is generated based on the annotated code and the annotations themselves. One of the most prominent frameworks that incorporates annotation processing is Project Lombok 2 which, among other features, has the option of generating getters and setters via annotation processing. The advantage of annotation processing is that the new methods are only created in the generated code and are not present in the actual versioned code, which in turn is more precise and contains less trivial boilerplate code. Furthermore, the generated code does not become obsolete and thus requires no maintenance.
Using an existing annotation processor
An annotation processor is in most cases already present if one is using third party libraries. The process of using it as code generator is easily described through the following example: suppose you want to map an object of type Company to its DTO CompanyDto. MapStruct 3 enables simple mapping of different types through generated classes which are described by annotations on an interface used as base.
Let us look at a Definition of a MapStruct mapper for a Company object to CompanyDto:
// File: CompanyMapper.java
@Mapper
public interface CompanyMapper {
	CompanyMapper INSTANCE = Mappers.getMapper(CompanyMapper.class);

	@Mapping(target = "companyName", source = "name")
	@Mapping(target = "companyAge", source = "age")
	CompanyDto map(Company company);
}
The actual usage of the mapper from above looks like this:
// File: CompanyMapperTest.java
@Test
void mapCompanyToDto() throws Exception {
    Company source = new Company("cronn GmbH", 10);

    CompanyDto destination = CompanyMapper.INSTANCE.map(source);

    assertThat(destination.getCompanyName()).isEqualTo("cronn GmbH");
    assertThat(destination.getCompanyAge()).isEqualTo(10);
}
In order to use an annotation processor (in this case MapStruct) it is necessary to inform the build tool that such a processor is present and should be used. Gradle, for example, employs the keyword “annotationProcessor” for this, as is shown below.
// File: build.gradle
dependencies {
    annotationProcessor("org.mapstruct:mapstruct-processor:${mapstructVersion}")
    ...
}
Using the above definition MapStruct then creates an implementation for the interface using the information given through the annotations. The output for this is shown below.
// Generated File: CompanyMapperImpl.java
public class CompanyMapperImpl implements CompanyMapper {

    @Override
    public CompanyDto map(Company company) {
        if ( company == null ) {
            return null;
        }

        String companyName = null;
        int companyAge = 0;

        companyName = company.getName();
        companyAge = company.getAge();

        CompanyDto companyDto = new CompanyDto( companyName, companyAge );

        return companyDto;
    }
}
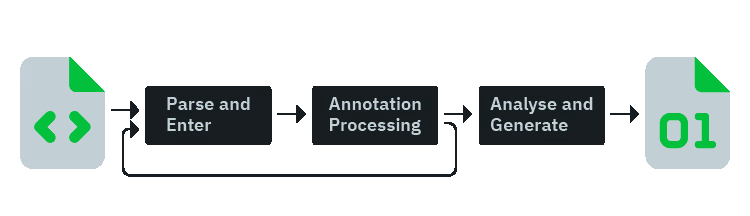
Through annotation processing, an interesting aspect of the Java compilation step becomes visible. Normally, the compilation to bytecode starts with the parsing step, continues with an analyzing step and ends with the bytecode generation (note that this is an oversimplification for the needs of this article). Annotation processing is directly incorporated into this process. After the parsing step, all relevant annotations are processed by processors and if new code has been generate the parsing step is restarted. By repeating these steps in multiple rounds it is possible to generate code in one annotation processor which itself contains annotations which may trigger further processors in following rounds. This is nicely illustrated in the OpenJDK article on Compilation Overview 4.
Custom code generator for annotation processing
The usage of existing annotation processors from third party libraries is already a big improvement for typical situations. However, the more interesting application is the development and use of custom generators. For this purpose, Java offers the javax.annotation.processing.Processor interface 5, which is already implemented in the abstract class javax.annotation.processing.AbstractProcessor. When creating a custom annotation processor either this interface has to be implemented, or the abstract class has to be extended in order to inform the compilation unit to use it. Through this, the custom processor inherits, among others, the methods getSupportedAnnotationTypes and process.
One of the first steps in creating a custom annotation processor is to tell the compilation unit, which annotations are handled by this processor. When inheriting from AbstractProcessor, instead of implementing getSupportedAnnotationTypes with a custom implementation, the supported annotations can be configured with the annotation @SupportedAnnotationTypes, which is used on the processor itself. Here, it is possible to use existing annotations as well as custom annotations specifically created for use with this processor. It is even possible to use wildcards for this.
The following example shows a custom annotation and how this is used in a custom annotation processor.
// File: Builder.java
package org.example;

@Retention(RetentionPolicy.SOURCE)
@Target(ElementType.TYPE)
public @interface Builder {
}
The custom annotation processor using the custom annotation from above looks like this:
// File: BuilderAnnotationProcessor.java
@SupportedAnnotationTypes("org.example.Builder")
public class BuilderAnnotationProcessor extends AbstractProcessor {

    @Override
    public boolean process(Set<? extends TypeElement> annotations, RoundEnvironment roundEnv) {
        ...
The process method is the one which is called by the compilation unit and where the actual generation happens. A set of all configured annotations and a RoundEnvironment for the current processing round are given as parameters. In order to get all elements that are currently annotated with the configured annotations, the round environment can be used by calling its method getElementsAnnotatedWith(…). Depending on the target, on which the annotation is specified, the returned elements may be of different element types like classes, fields or methods (e.g. in the upper example for @org.example.Builder the target ElementType.TYPE was used, which specifies classes, interfaces, enums and records).
// File: BuilderAnnotationProcessor.java
@Override
public boolean process(Set<? extends TypeElement> annotations, RoundEnvironment roundEnv) {
    for (Element classElement : roundEnv.getElementsAnnotatedWith(Builder.class)) {
        String className = classElement.getSimpleName().toString();
        process(className);
    }
}
For the actual Java file creation, a Filer 6 instance can be used, which already has information about the build location for newly created files. Additionally, to the RoundEnvironment mentioned above, when inheriting from AbstractProcessor, a ProcessingEnvironment also exists, which can be accessed from child classes and be used in order to get such a Filer instance for creating new source files.
// File: BuilderAnnotationProcessor.java
private void process(String className) {
    ...
    try {
        JavaFileObject sourceFile = processingEnv
            .getFiler()
            .createSourceFile(getSourceFileName(className));

        try (Writer writer = new BufferedWriter(sourceFile.openWriter())) {
            writer.write(generateSourceCode(...));
        }
    } catch (IOException e) {
        // handle exception
        ...
    }
}
The final code that is generated by the processor, is just text that is written with the file writer of the filer instance. Therefore, it can be created in different well-known ways, e.g. by using string concatenation, StringBuilders or multi-line strings with formatters. However, if its content gets too complex, dedicated frameworks like 7 or more elaborate techniques like StringTemplates 8 are advised. The custom code generator in our example code 9 builds up on StringTemplates and shows some of the capabilities there. As mentioned previously, the generation process repeats itself in the case of newly created files also containing annotations for which annotation processors exist.
As described above, it is important to note that the complete annotation processing happens during the compilation step. If debugging is desired it is therefore necessary to add debug information to this, for example in the case of Gradle, by adding the -Dorg.gradle.debug=true flag to the current Gradle task. Through this, it is possible to use typical debugging tools, which make the development of such a code generator as simple as regular code.
In order to use the custom annotation processor during compilation of the target code, the compiler has to be informed about the existence of a processor to be used. There are different ways to achieve this, ranging from specific javac options like javac -processor …, to maven plugins. It is also possible to register it in the meta information of the build jar file in a file typically named META-INF/services/javax.annotation.processing.Processor, where each annotation processor is listed line by line. This is also the solution used in our example code. To make this process even easier, Google AutoService library 10 automatically creates such a file (interestingly enough, by using annotations and generating the file through annotation processing).
// File: META-INF/services/javax.annotation.processing.Processor
org.example.BuilderAnnotationProcessor
Conclusion
Many possibilities exist for automatic generation of simple code in Java. This article presented Annotation Processing, which is easy to use and deeply integrated in the Java environment. Potential applications range from builder classes, object mappers between different domain models, (fluent) setters and getters, automatic generation of constructors and boilerplate methods such as toString() and hashCode(). All of which can be used by adding a single annotation to the target code. Our example code 9 demonstrates the usage of existing third party libraries as well as the creation of custom annotations and generators. Due to the mentioned versatility and ease-of-use annotation processing is a powerful tool in the Java ecosystem.
-
Project Lombok Note: unlike typical annotation processors, in order to fulfill all its goals, Project Lombok directly manipulates the
.classfiles instead of creating new.javafiles first ↩